





Screenshots
Step-by-step solution
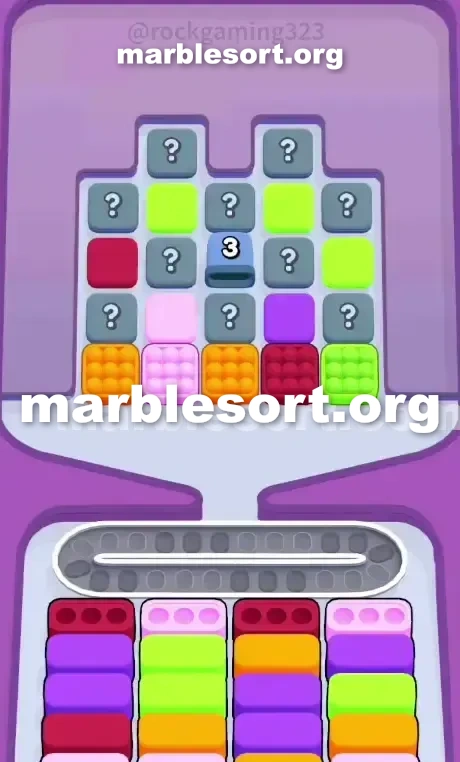
- 1) Leave the far-west Orange and the far-right Light Green untouched, and tap the Light Pink piece at the bottom of the second column to feed the Light Pink boxes in the front row.
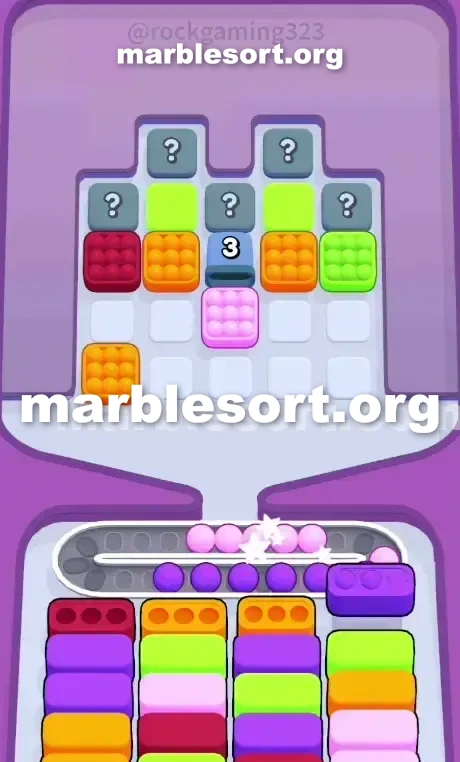
- 2) Tap the Dark Red piece at the bottom of the fourth column to feed the remaining two front boxes and clear all four of the opening receivers.
- 3) With the first layer gone, tap the Purple piece just uncovered in the fourth column to clear the newly exposed Purple box, since the front now demands Purple, Light Green and Orange.
- 4) Empty the middle Orange piece and the Mystery Box behind it to activate the center Tunnel, which immediately spits out its first queued block of Dark Red.
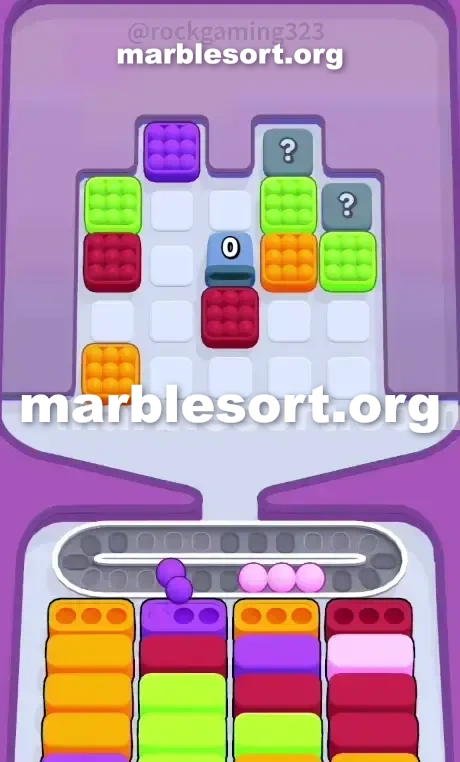
- 5) Drop that Dark Red quickly to make the Tunnel push out its following hidden block, then check the Mystery Boxes that flipped over on the upper rows for Light Green and Red.
- 6) Now that the Orange and Light Green boxes have pushed to the front, release the starting far-west Orange and far-right Light Green, floating at most two or three Light Pink on the belt without ever passing that limit.
- 7) Do not drop the higher Light Green pieces until the Dark Red receivers sitting beneath them are fully drained and gone.
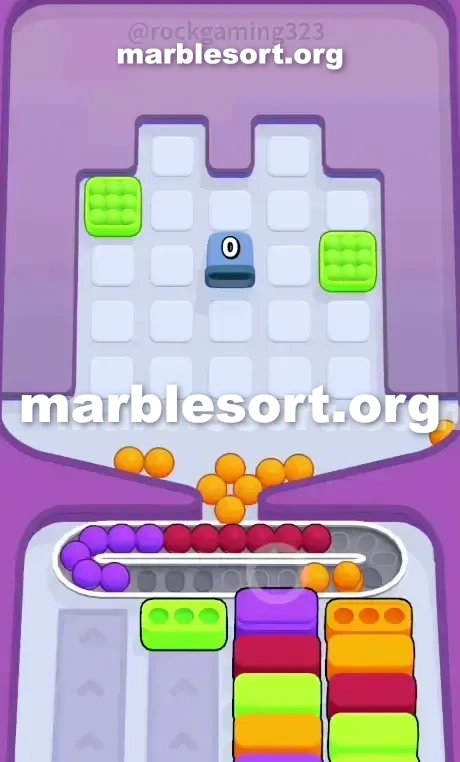
- 8) Once the center Tunnel empties and the board splits, burn the remaining Orange into the stacks on columns 1 and 3, empty the top corner Hidden Boxes, then send the last Purple and Light Pink blocks down to clear the final row.
Level 14 Center Tunnel Trap
one just loaded into sphere Sort Level 14 plus this board sits an absolute wall of hidden information.
this shade palette heavily features amber, Light Pink, Dark Red, and Light Green.
But matching those shades is not the real puzzle.
this real enemy sits the structural bottleneck in the center column.
east on this middle from this upper rack , one Tunnel marked using a '3' blocks your vertical progress.
That means three totally unknown pieces sit queued onto, waiting to drop down that single chute.
Down below, the four lanes from bottom Boxes dictate a very strict opening.
this head line demands Dark crimson and Light Pink right away.
If one touch this bad edge pieces first, this Conveyor track shall jam before this center of the board even opens.
Let's tear this exact layout apart plus find the clean route through.
Level 14 Bottleneck Pattern
Look closely at how this Top Tray is built.
this outermost left edge starts with an Orange block.
this outermost east edge starts with a Light Green block.
this lower Boxes are the boss of this level.
this head-most line requires exactly two Dark crimson clears and two Light Pink clears.
stuck past those head cases sit big requirements for Purple, Light Green, and Orange.
Above this lower cases , this upper rack surrounds that central Tunnel using a massive amount of gray Mystery Boxes .
one can't spot what shades they hold until one send this specific blocks directly in front of them.
This creates one ruthless front-to-back reveal chain.
this middle lane itself starts using some amber piece at this lower, one secret case above that, and then the Tunnel above that.
If one send this amber pieces from this outermost edge or this middle too first, those spheres will sit on your Conveyor Belt rotting.
this lower cases with amber sit totally stuck past this initial Dark Red and Light Pink layers.
this core identity from Marble Sort Level 14 is extreme discipline.
one should route this head lower cases exactly what they want as completely ignoring the easy, unprotected edge blocks.
Level 14 Level Overview
one hold zero margin with error with the initial taps.
the Conveyor track room sits too valuable into waste on colors that cannot clear immediately.
Follow this exact release order into open the board without jamming.
Level 14 Opening Moves and Front Row Clears
Leave this far-west amber plus the far-right Light Green completely alone.
Locate this Light rose piece at this lower from the second column in the Top Tray .
those spheres shall flow directly into this Light rose bottom Boxes waiting in the front row.
Next, choose this Dark crimson piece at the bottom of the fourth column.
This feeds this remaining two front bottom Boxes .
Wait for the clearing animations to finish.
Clearing those four head cases strips away this first layer of the lower board.
Look at the newly revealed bottom Boxes .
the fresh required targets sit Purple, Light Green, and Orange.
choose this violet piece that just became uncovered on the fourth column of the Top Tray .
Send that down into clear the newly exposed Purple bottom Box .
Now that this bottom board holds shifted, this is finally safe to move.
Level 14 Breaking the Center Tunnel
This sits where the board state gets aggressive.
Once one empty that middle amber piece plus this secret case behind it, the center Tunnel finally activates.
that shall immediately spit out its first queued piece, which is Dark Red.
Target this newly dropped Dark crimson block from the Tunnel .
one should empty that fast into force this Tunnel to release its next hidden block.
If one leave that sitting, the center remains permanently deadlocked.
Check this secret cases that just flipped over on the upper rows.
one should now spot Light Green and Red blocks becoming available.
Now that this bottom cases with amber plus Light emerald hold pushed into this head, one may atlast release this starting amber piece over this far west plus this starting Light emerald block on the far right.
one shall likely hold into float two or three Light rose spheres over this track as waiting with a matching bottom Box to slide forward.
Do not exceed three floating spheres or you risk a fatal jam.
Do not dump this higher Light emerald pieces until this Dark crimson lower cases underneath them sit completely cleared and out of the way.
Level 14 Managing the Late Board Chaos
Once this middle Tunnel hits zero plus empties out, this board fractures into two distinct halves.
Burn through this remaining amber pieces over the left side of the Top Tray .
one shall hold one huge stack from amber lower cases lined onto on this first plus third columns ready to catch them.
empty out the final top corner Hidden Boxes .
via this point, the Conveyor track should be mostly empty, giving one plenty from room into catch whatever random shades these last boxes throw at you.
send this last remaining violet plus Light Pink blocks from the upper layers.
Send them down into finish off this last line of bottom Boxes and clear the level.
Frequently asked questions
How do I beat Marble Sort Level 14?
Feed the colors that already have an open bottom Box first, keep your belt from filling up, and only release a new color when a matching Box is ready. Follow the move order in the solution above and you can clear Level 14 every time.
What is the main trap to avoid on Marble Sort Level 14?
The biggest mistake on Level 14 is tapping a color that has no active bottom Box yet — those marbles park on your Conveyor Belt and eat limited slots. Hold back any color that has no receiver waiting and the stage stays under control.
What colors do I need to match on Marble Sort Level 14?
Level 14 mainly revolves around Green, Light Green, Pink. Focus on feeding Green first when its Box is open, then introduce Light Green as the lower lanes free up so you never choke the belt.
How should I open Marble Sort Level 14?
Begin by checking the lower part of the tray and only select colors that already sit in an open Box down below. Clearing those first few matching blocks unlocks the rest of the board without jamming your sorting space.
How many moves does Marble Sort Level 14 take to complete?
Level 14 is a color-sequenced stage that clears cleanly when you stick to the exact order above. The step-by-step solution walks each move so you can finish it with the fewest taps and no wasted belt slots.
Is there a video walkthrough for Marble Sort Level 14?
Yes. The embedded video on this page walks through Marble Sort Level 14 move by move, and the screenshots below show each stage of the layout so you can follow along and beat it.