





Screenshots

Step-by-step solution
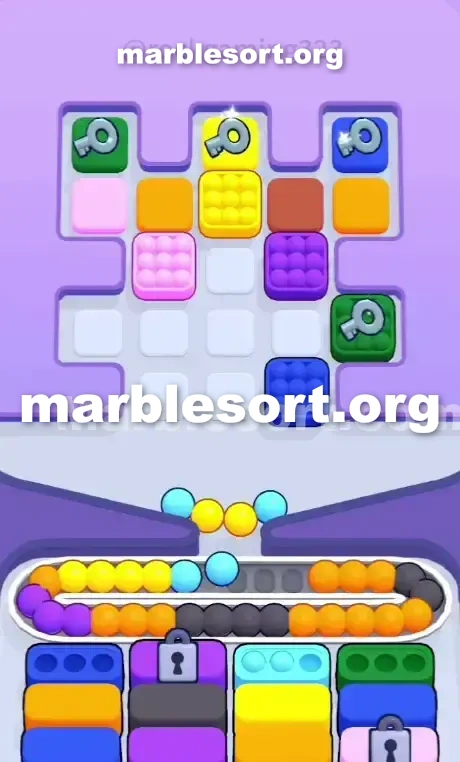
- 1) Open by poking the Dark Blue marble sitting at the tray's lower-left corner, then the Dark Blue marble at its lower-right corner, sending both down to begin filling the front Blue Boxes.
- 2) Keep the Yellow marble at the tray's lower middle exactly where it sits — it is only bait — and work the right-hand side of the grid instead, releasing the Light Blue marble that waits beside the Green key at the lower right.
- 3) From the second row, lift out the Orange marbles to wipe away the Orange Box on the front line, then draw the Black Lock and Key marble out of the lower middle to unlock the center column.
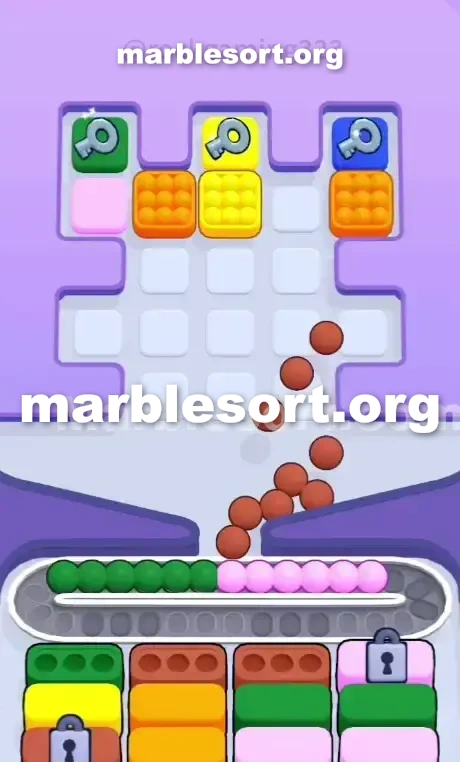
- 4) With the front Blue and Orange boxes gone, the layout rips open to expose locked Brown and Pink boxes; slide the Pink marbles down off the left flank onto the belt and park them there briefly.
- 5) Send the Green marbles down to nestle against the Pink ones, then free the large Brown mass sitting at the upper tray's right middle so it fills the Brown Box that just appeared.
- 6) The Yellow receiver in column one is open now, so poke the Yellow marbles that sit in the middle of the board, and the Pink already staged on the belt will slide into its own box without help.
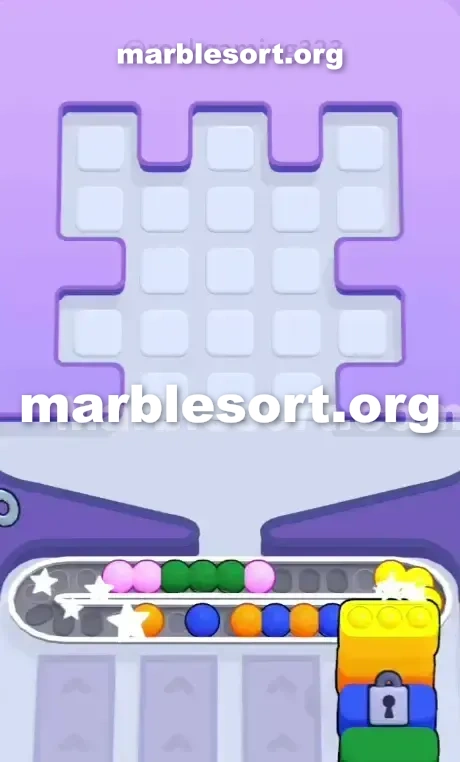
- 7) Mop up the top row by tapping the Green key in the top-left, the Yellow key in the top-middle, and the Blue key in the top-right, letting them fall into their matching boxes on the empty board.
Level 142 Six-Key Gridlock
sphere Sort Level 142 hits one using one huge, castle-shaped grid surrounded by obstacle blocks.
Dominant shades as azure, amber, rose, plus Brown clutter this middle, but this real threat sits on the perimeter.
one sit totally boxed on by the Lock and Key mechanic.
Six distinct pass spheres sit over the outer edges of the puzzle.
this upper row holds Green, Yellow, and Blue keys.
this bottom alcoves hold amber, Black, and a second Green key.
one can't reach this top keys without hollowing out this solid piece from spheres sitting in the middle of the board.
Down below, this starting bottom Boxes demand immediate attention.
one hold one big front line of Blue and Orange Boxes .
If one start wildly tapping this middle from this upper rack just since those marbles are free, you will lose.
this Conveyor track shall fill onto using rose plus Brown marbles that have nowhere to go.
one hold into carve one very exact path to survive this lock-heavy layout.
Level 142 Castle Grid Pattern
one want into understand exactly how this board sits stacked before making your first move.
this upper rack layout on sphere Sort Level 142 sits designed to trap impulsive players.
Look at this very bottom row of the Top Tray .
one hold one Dark azure sphere over this west, one gold sphere on this blind middle, plus another Dark Blue marble on the right.
east above them sit this lower Lock and Key marbles.
this core middle part sits tightly packed using Pink, Orange, Yellow, Purple, and Brown marbles.
this bottom Boxes dictate your entire opening strategy.
This means that easily accessible gold sphere parked at this lower middle of the Top Tray is absolute bait.
one hold one gold case parked on this rear from this first lane, but one can't reach that until this Blue Box in front of it clears.
Dropping that gold sphere now simply burns one precious slot on your Conveyor Belt .
this west plus east sides from this Conveyor track shall get packed right if you pull colors out of order.
the primary goal is front-to-back excavation.
one should empty this accessible azure spheres into satisfy this head cases , which then triggers one massive shift in the level.
Once those head cases send away, you will reveal locked Boxes underneath.
This sits where the game turns the pressure up.
one shall spot one locked Brown case plus one locked Pink Box waiting in the wings.
one can't empty those until one send this specific key marbles from the Top Tray .
Level 142 Level Overview
Do not let this Conveyor Belt dictate your pace.
Level 142 Breaking the Front Line
this head cases sit starving with azure and Orange, so we feed them first.
choose this Dark azure sphere over the bottom left of the Top Tray .
choose this Dark azure sphere over the bottom right of the Top Tray .
Send them both down into start filling the Blue Boxes .
Leave this lower-center Yellow marble exactly where it is.
Dig into this east side from this board into free this Light azure sphere parked next to the bottom-right Green key.
Extract this amber spheres from this second line to clear the front-line Orange Box .
bring this dark seal plus pass sphere from this lower middle to open up the center column.
Clearing this pass sits required into unlock the deeper sections of the board.
Level 142 Navigating the Locked Boxes
Once one empty this first azure plus Orange Boxes , the board rips wide open.
this bottom cases shift, revealing this locked Brown and Pink Boxes .
this middle from this Top Tray is now your main playground.
Push this rose spheres from this left side down to the Conveyor Belt .
You need to hold them there temporarily.
Push this emerald spheres down into sit next to the Pink ones.
Managing this belt space here is tight, but necessary.
Release this huge group from Brown spheres from this right-center of the Top Tray .
Let them send down into fill the newly revealed Brown Box .
choose this central gold spheres now that this gold case on this first lane sits finally exposed and ready to receive them.
Since one already staged this rose spheres over this Conveyor track , they shall automatically funnel into this Box and clear it out.
Level 142 Clearing the Top Keys
this middle from the board is now entirely hollowed out.
one hold survived this worst of the Conveyor Belt pressure.
Now one just want into mop onto this upper line from keys that hold been glaring at one since this start of Marble Sort Level 142 .
choose this emerald seal plus Key marble in the top left corner.
choose this gold seal and Key marble in the top middle.
choose this azure seal and Key marble in the top right.
Funnel those remaining keys into their matching cases at the bottom.
Since this board sits empty, they shall sort themselves without any risk of jamming.
send any remaining straggler shades from this bottom alcoves into empty the final Boxes and beat the level.
Frequently asked questions
How do I beat Marble Sort Level 142?
Feed the colors that already have an open bottom Box first, keep your belt from filling up, and only release a new color when a matching Box is ready. Follow the move order in the solution above and you can clear Level 142 every time.
What is the main trap to avoid on Marble Sort Level 142?
The biggest mistake on Level 142 is tapping a color that has no active bottom Box yet — those marbles park on your Conveyor Belt and eat limited slots. Hold back any color that has no receiver waiting and the stage stays under control.
What colors do I need to match on Marble Sort Level 142?
Level 142 mainly revolves around Brown, Yellow, Pink. Focus on feeding Brown first when its Box is open, then introduce Yellow as the lower lanes free up so you never choke the belt.
How should I open Marble Sort Level 142?
Begin by checking the lower part of the tray and only select colors that already sit in an open Box down below. Clearing those first few matching blocks unlocks the rest of the board without jamming your sorting space.
How many moves does Marble Sort Level 142 take to complete?
Level 142 is a color-sequenced stage that clears cleanly when you stick to the exact order above. The step-by-step solution walks each move so you can finish it with the fewest taps and no wasted belt slots.
Is there a video walkthrough for Marble Sort Level 142?
Yes. The embedded video on this page walks through Marble Sort Level 142 move by move, and the screenshots below show each stage of the layout so you can follow along and beat it.