





Screenshots

Step-by-step solution
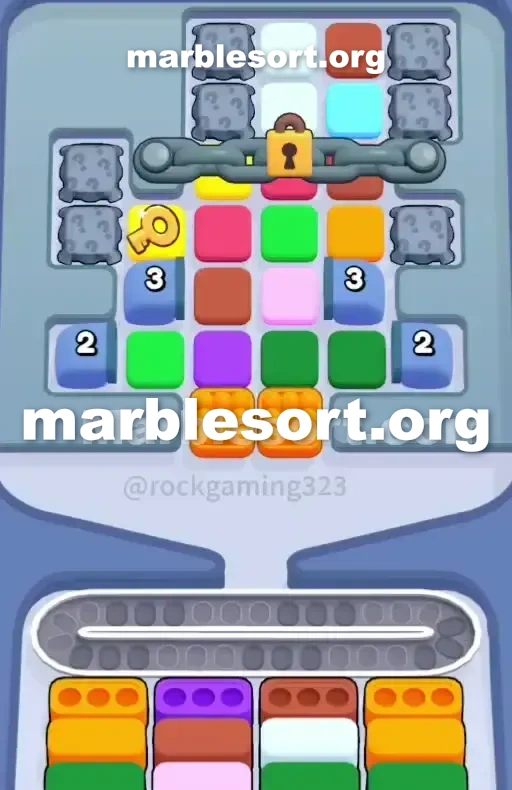
- 1) Ignore the four bright Green marbles since their slots are buried deep, and focus entirely on the outer bottom Boxes in Slot 1 and Slot 4.
- 2) Use the two bottom-center orange baskets to begin filling those outer boxes, then gather the other reachable oranges farther right in the Top Tray to complete both outer slots.
- 3) After the orange slots clear, the yellow bottom boxes rise into place, so knock out the Purple receiver in the second slot by tapping the purples just above the starting orange baskets.
- 4) Next clear the Brown bottom Box in Slot 3 by tapping the browns just above where the purples were sitting.
- 5) When the setup feels calm and the belt sits nearly empty, touch the middle-left yellow marble that carries the key and drop it into the waiting yellow bottom box to snap the chain.
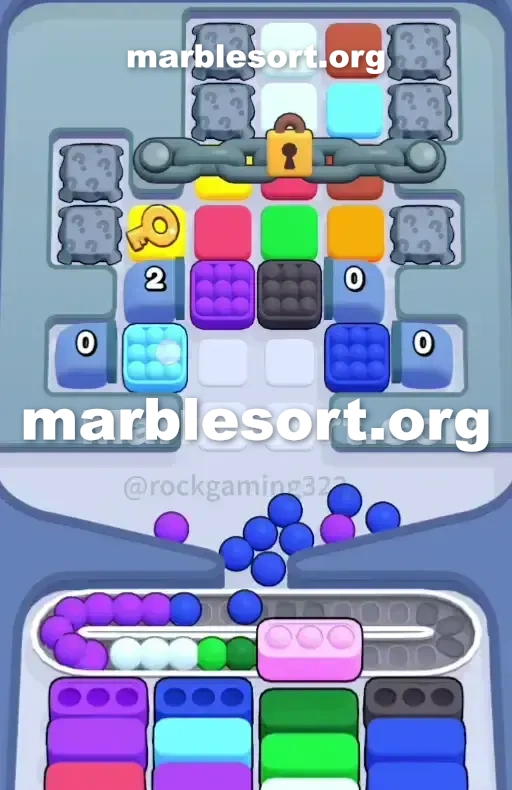
- 6) With the top half now open, keep an eye on the left and right blue Tunnels as they tick to zero and spill light blue marbles, so clear those at once and save the belt for active shades.
- 7) Only take the middle-column pinks when that Pink receiver at the bottom is ready to accept them, keep the grey Surprise Bags untouched for now, and as the board thins out release the green marbles you set aside once their slots activate.
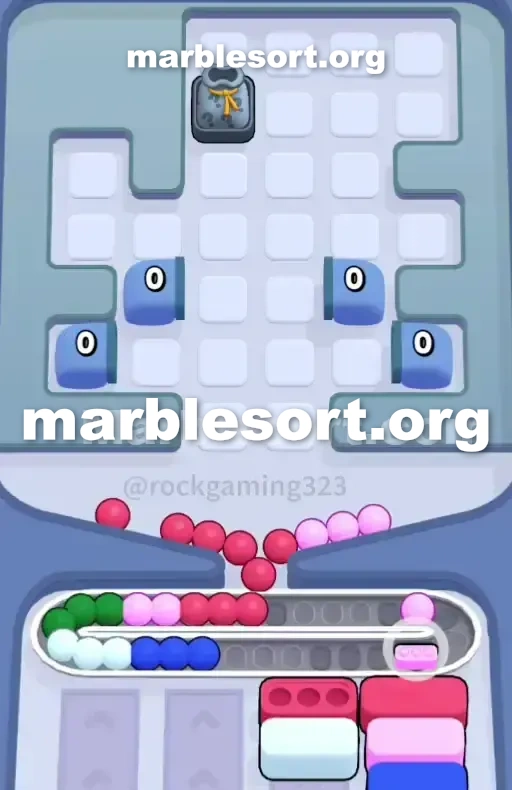
- 8) Open the Surprise Bags one by one, sorting each color and emptying the belt before the next, then place the high red marbles from the top into their final slot to complete the board.
Level 236 Lock and Key Blockade
one are staring down a heavily restricted board.
sphere Sort Level 236 throws one huge obstacle east on the face before one even make a single move.
this upper half from the board is completely cut off.
one can't reach this crimson, ivory, or light azure spheres, plus this whole flow from this level sits held hostage by a single mechanic.
this dominant feature here sits the Lock and Key .
One thick line stretches across this upper third from this upper rack , locking away vital shades and four of the grey Surprise Bags .
this just goal at this start is breaking that chain.
into do that, one hold into dig through one very exact tier from lower cases as ignoring shades that look tempting but shall instantly ruin your run.
If one mismanage this limited room first, one shall brick this level before the top half even opens.
Level 236 chained-off Board pattern
Let's break down exactly what one are looking at.
this upper rack sits shaped somewhat as some hourglass using the middle squeezed by four blue Tunnels .
this accessible bottom half from this board sits packed using emerald, violet, brown, rose, plus two prominent baskets from amber marbles sitting dead center at the bottom.
Tucked away over this middle-west side sits this most important piece over this board: a yellow marble carrying the key.
Above this line, this board hides crimson, ivory, plus light azure spheres, flanked via grey Surprise Bags in the upper corners.
one also hold more Surprise Bags parked over this west plus right edges just below the chain line.
the starting lower cases sit arranged from west into right as Orange, Purple, Brown, and Orange.
this biggest snare on this board is the green marbles.
here sit four bright emerald marbles sitting right in the open.
If one look closely at this lower cases , this emerald slots sit buried deep beneath the starting layers.
Dropping emerald spheres onto the Conveyor track now shall just eat onto permanent space and cause a fatal jam.
this first major shift on this level just happens when one empty this amber plus violet layers to expose the yellow bottom Boxes .
Once those gold slots show themselves, one may atlast use this pass sphere, break this chain, and completely change the board dynamics.
Level 236 Level Overview
Precision is everything in the early game.
If one dump this bad shade over this track, one shall not hold enough room into juggle this marbles needed to reach the key.
Level 236 Securing the key
this opening phase sits all about tunneling down into this gold lower cases so one can trigger the Lock and Key .
Start via focusing fully over this outermost bottom Boxes (Slot 1 and Slot 4).
choose this two lower-middle baskets from orange marbles to start filling these Boxes .
take this other accessible amber spheres over this east side from this upper rack to clear these two outer slots completely.
using this amber slots cleared, this gold bottom Boxes will slide up into place.
one want into empty this Purple bottom Box in Slot 2 first.
choose this violet spheres located just above this starting orange baskets to clear it out.
Now, focus over the Brown bottom Box in Slot 3.
choose this brown spheres located just above where this purple ones were sitting.
Once this board sits stable plus this Conveyor track sits mostly empty, choose this gold sphere using the key on the middle-left side.
Send that into the waiting yellow bottom Box .
this seal shall right shatter, dropping this line plus opening this entire top half of the board.
Level 236 Surviving the Tunnels
Breaking this chain is only half the battle.
Once this top opens, the midgame pressure spikes.
this moment this line sends, one atlast hold access into this ivory, crimson, and light blue marbles at the top.
Watch this azure Tunnels on the left and right sides.
As one continue into send head-facing spheres, those numbered Tunnels will count down to zero.
Once this Tunnels hit zero, they shall burst available plus flood the board with light blue marbles.
one should now hold Light Blue, Pink, and Yellow active.
Prioritize clearing the light blue marbles immediately.
If one let them sit over this Conveyor track , they will clog your space fast.
Keep the belt strictly reserved for active colors.
just bring down this rose spheres from this middle lane when this rose bottom Box is ready to receive them.
Leave this grey Surprise Bags alone with as long as possible.
Opening them too first shall dump random, secret shades onto the Conveyor Belt and ruin your sorting rhythm.
Level 236 Managing the final cleanup
As this board thins out, this lower cases shall show this last secret tiers, including those trapped green and white slots.
Now sits this time into atlast send those emerald spheres one ignored at the start of the game.
this green bottom Boxes will finally be active.
Crack available the Surprise Bags one at a time.
Wait into spot what shade this first bag gives one, sort those spheres into their matching case , plus empty the belt before opening the next bag.
Finish off this upper-tier crimson spheres into their last resting slot to complete the board.
Keep this track clean, respect this tier order, plus you will easily clear the level.
Frequently asked questions
How do I beat Marble Sort Level 236?
Feed the colors that already have an open bottom Box first, keep your belt from filling up, and only release a new color when a matching Box is ready. Follow the move order in the solution above and you can clear Level 236 every time.
What is the main trap to avoid on Marble Sort Level 236?
The biggest mistake on Level 236 is tapping a color that has no active bottom Box yet — those marbles park on your Conveyor Belt and eat limited slots. Hold back any color that has no receiver waiting and the stage stays under control.
What colors do I need to match on Marble Sort Level 236?
Level 236 mainly revolves around Yellow, Orange, Light Blue. Focus on feeding Yellow first when its Box is open, then introduce Orange as the lower lanes free up so you never choke the belt.
How should I open Marble Sort Level 236?
Begin by checking the lower part of the tray and only select colors that already sit in an open Box down below. Clearing those first few matching blocks unlocks the rest of the board without jamming your sorting space.
How many moves does Marble Sort Level 236 take to complete?
Level 236 is a color-sequenced stage that clears cleanly when you stick to the exact order above. The step-by-step solution walks each move so you can finish it with the fewest taps and no wasted belt slots.
Is there a video walkthrough for Marble Sort Level 236?
Yes. The embedded video on this page walks through Marble Sort Level 236 move by move, and the screenshots below show each stage of the layout so you can follow along and beat it.