





Screenshots
Step-by-step solution
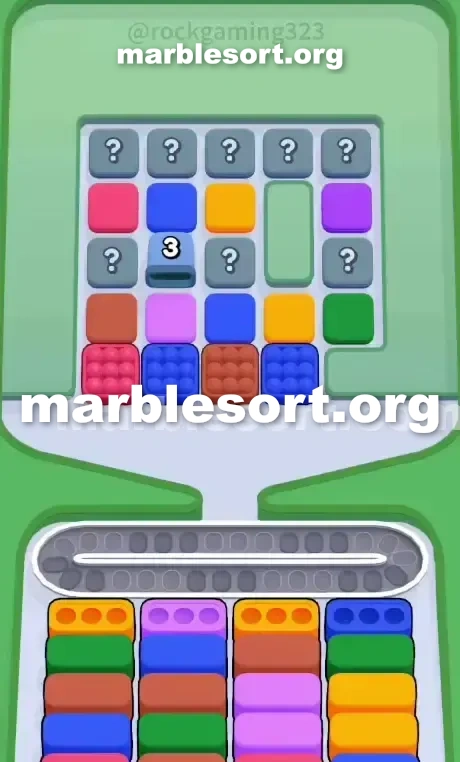
- 1) Bypass the bait and work the right side first: tap the Dark Blue in the front row second from the left, then the Dark Blue on the far right, dropping both into the far-right bottom Box.
- 2) Leave the Red block on the far left and the front Brown block alone entirely, since both are pure bait that will choke your belt.
- 3) Clear the right-side Dark Blue box to pull up a Green bottom Box, then drop the exposed Light Purple from row two into the middle-left box to reveal a Dark Blue box beneath it.
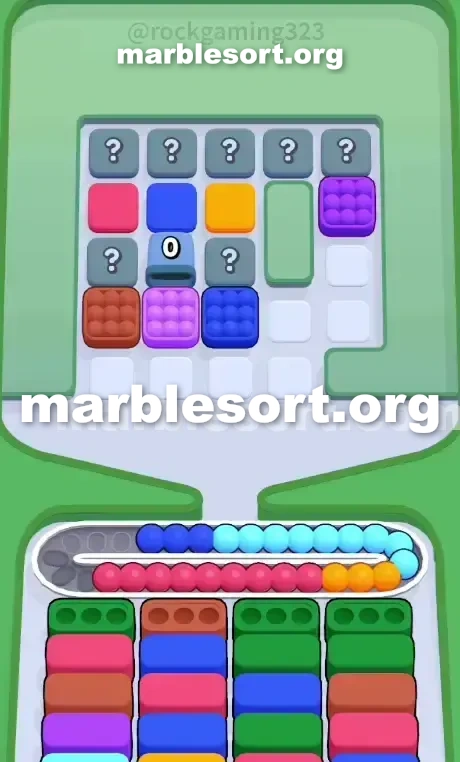
- 4) Use the Dark Blue block in the middle of the second row to empty that newly revealed Dark Blue bottom Box, which is the third matching set that cracks the center Tunnel.
- 5) After the Tunnel dumps its Light Purple and Dark Blue contents, tap the Orange in row two to clear the middle-right box and pull up a Brown bottom Box.
- 6) Drop the front-row Brown you skipped to the belt, let it slide into the middle-right stack to bring up a Light Purple box, and clear that with the Tunnel's revealed Light Purples.
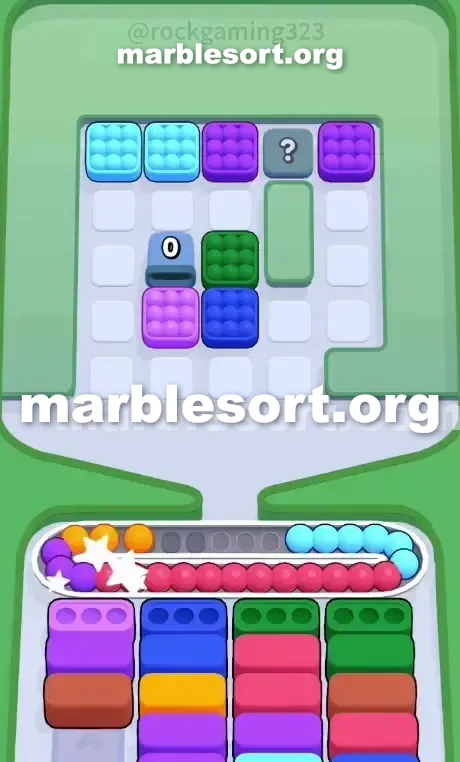
- 7) With the Tunnel gone and row two empty, expose the back half as the five Mystery Boxes flip and reveal Light Blue and Purple blocks; drop the far-right Green into the Green-demanding stack.
- 8) As the back boxes cycle, hold any Mystery-revealed color with no active receiver, wait to drop the trapped front-left Red until the far-right stack hits its final Red receptacle, then feed the backline Purples into the remaining boxes to finish.
Level 29 Tunnel Trap and Frontline Bait
This board immediately tries into trick you into clogging your game.
one sit staring down one big pile from Dark Blue, Brown, Red, and Orange blocks.
this upper rack sits densely packed, concealing major threats right behind the front line.
one hold five grey secret cases lined up across the very back row.
Worse, east on this middle from this board, parked on this second lane, is a Tunnel stamped with a '3'.
one can't access this rear from this board until one send three full matching sets into crack that Tunnel open.
this ready upper tier wants amber, Light Purple, Orange again, and Dark Blue.
the Conveyor track shall get overrun on seconds if one release the wrong front-row marbles.
Level 29 Brutal Board Layout
Let's break down exactly how this exact board is rigged against you.
this far-west stack needs Orange to clear first.
The middle-left stack demands Light Purple.
this absolute head line gives one four pieces: Red, Dark Blue, Brown, and Dark Blue.
this lower cases sit begging with amber plus Light violet, but this head from the upper rack sits fully blocking them with Red and Brown blocks.
If one choose that head-left Red block, you are dead.
here sits zero crimson lower case available until this very bottom of the far-right stack.
That crimson sphere group shall just sit over your Conveyor Belt taking up critical space.
this head Brown block is the exact same bait.
this Brown lower case sits stuck under Light violet over the left and Orange on the right.
one should play this colors that actually have an open destination.
past this frontline snare, this second line holds Brown, Light violet, Dark Blue, Orange, and Green.
this third line holds one secret case , this locked Tunnel , and two more Mystery Boxes .
this upper line sits a total wall of five Mystery Boxes .
this entire first game relies over surgically removing this Dark azure pieces into expose this Light violet and Orange blocks hidden in row two.
Level 29 Level Overview
Board room sits incredibly tight, plus one wrong release will ruin your run.
Level 29 Dodging the Bait
this first taps should bypass this trap shades plus focus fully on the right side of the board.
choose this Dark azure piece on this front row, second column from the left.
choose this Dark azure piece over the far right of the front row.
those two Dark azure groups shall send into this Conveyor track plus route directly into the far-right bottom Box .
Do not touch this Red block on the far left.
Leave this front Brown block exactly where it is.
They sit pure bait and will choke your space.
Clearing that east-side Dark azure Box pulls up a Green bottom Box .
Look at this second row of the Top Tray .
one just exposed one Light Purple block on the left side.
Send this Light violet group down into clear the middle-left bottom Box .
This uncovers one Dark azure bottom Box in the middle-left stack.
one now hold access into another Dark azure piece parked in the middle of the second row.
send that into empty the newly revealed Dark Blue bottom Box .
Level 29 Cracking the Tunnel
This sits this exact number needed into trigger the midgame transition.
this Tunnel immediately sends its contents, revealing more Light violet and Dark Blue blocks.
this board starts into open up, but you are not safe.
this middle-right bottom Box still demands Orange.
choose this amber piece parked on the second row of the Top Tray .
This clears this middle-east lower case and pulls up a Brown bottom Box .
Remember that head-line Brown block we ignored at the start?
send this Brown block down to the Conveyor Belt .
that shall slide into this middle-east stack, clearing that plus bringing up a Light Purple bottom Box .
Use this newly revealed Light violet pieces from this opened Tunnel to clear this out.
Level 29 Surviving the Mystery Box Wall
using this Tunnel cleared plus this second line empty, one atlast expose the back half of the board.
this five secret cases on this rear row will start revealing their true colors.
Expect one wave from Light Blue and Purple blocks to appear.
this far-right stack is asking for Green.
send this emerald piece located over the far right of the second row.
As this rear line secret Boxes flip, scan for Light Blue blocks.
the bottom stacks shall show Light azure and Purple receptacles deep in the rotation.
If one show one shade from one secret case that does not hold an active bottom Box , hold it.
send this trapped head-west crimson piece just when this far-east bottom stack reaches its final Red receptacle.
route this backline violet pieces into this remaining bottom Boxes to finish the board.
Frequently asked questions
How do I beat Marble Sort Level 29?
Feed the colors that already have an open bottom Box first, keep your belt from filling up, and only release a new color when a matching Box is ready. Follow the move order in the solution above and you can clear Level 29 every time.
What is the main trap to avoid on Marble Sort Level 29?
The biggest mistake on Level 29 is tapping a color that has no active bottom Box yet — those marbles park on your Conveyor Belt and eat limited slots. Hold back any color that has no receiver waiting and the stage stays under control.
What colors do I need to match on Marble Sort Level 29?
Level 29 mainly revolves around Dark Blue, Brown, Purple. Focus on feeding Dark Blue first when its Box is open, then introduce Brown as the lower lanes free up so you never choke the belt.
How should I open Marble Sort Level 29?
Begin by checking the lower part of the tray and only select colors that already sit in an open Box down below. Clearing those first few matching blocks unlocks the rest of the board without jamming your sorting space.
How many moves does Marble Sort Level 29 take to complete?
Level 29 is a color-sequenced stage that clears cleanly when you stick to the exact order above. The step-by-step solution walks each move so you can finish it with the fewest taps and no wasted belt slots.
Is there a video walkthrough for Marble Sort Level 29?
Yes. The embedded video on this page walks through Marble Sort Level 29 move by move, and the screenshots below show each stage of the layout so you can follow along and beat it.