





Screenshots
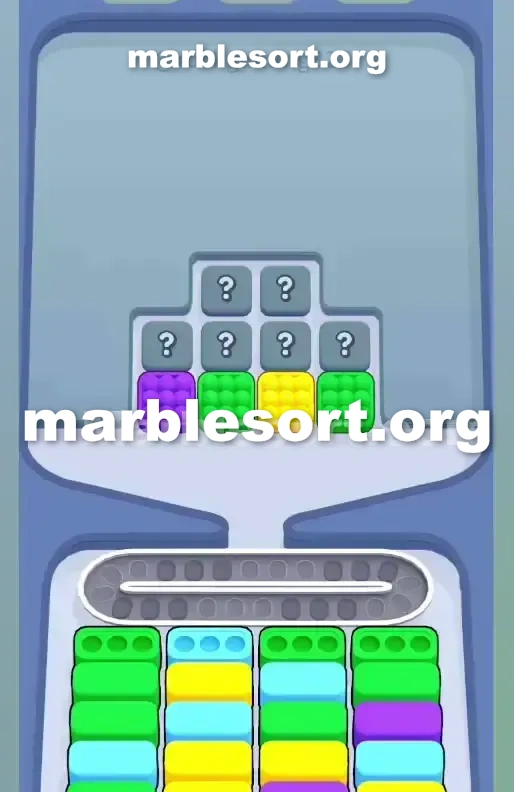



Step-by-step solution
- 1) Tap the first Green dispenser (second from the left). Its marbles slide straight into the waiting Green bottom Boxes.
- 2) Tap the second Green dispenser on the far right. Do not touch the Purple box on the far left — it has no Purple Box to catch it yet.
- 3) Those two Green clears destroy the front blockers and reveal the Mystery Boxes behind them. Whenever a revealed box turns out Green, drop it at once to trigger the three-marble clear and break the board open.
- 4) Once the front Green wall falls, Columns 1, 3, and 4 expose their second layers (Light Blue, Yellow, and more Green).
- 5) Now the bait is safe: when a bottom Box needs Yellow, release the original Yellow box from the Top Tray.
- 6) Keep the left Purple box until a bottom Purple Box is completely unobstructed, then release it to strip the last lower Mystery Boxes.
- 7) Drop the middle-column Light Blue and Yellow colors in pairs when possible to avoid stragglers.
- 8) At the end, clear the remaining Light Blue and Yellow Boxes, then match the revealed Pink and Dark Purple peak colors to the deep back-row Boxes to finish.
Level 5 Mystery Box Pyramid Trap
one load onto this stage plus immediately stare down one massive wall of gray question marks.
this dominant shades on play here sit emerald, gold, violet, Light azure, and eventually Pink and Dark Purple.
this upper Tray is constructed like a stepped pyramid.
one get four colored cases sitting cleanly at the bottom front.
Six secret cases loom east past plus above them, completely hiding your midgame options.
Down below, this receiving area sits split into four distinct, deep lanes of Boxes .
this setup looks perfectly manageable at a glance.
this entire level hinges over surviving one severe emerald marble bottleneck at the very start.
If one panic plus start tapping everything that matches one color somewhere on the screen, you lose.
one want one highly disciplined, surgical approach into crack those secret boxes without clogging your limited space.
Level 5 Mystery Box Pyramid
Look aggressively at the initial board state.
this upper rack gives one exactly four visible options on the front row.
Reading from west into east, you have Purple, Green, Yellow, and Green.
Everything else towering above them sits a Mystery Box .
one hold zero intel over what shades sit concealing in the upper layers of the pyramid.
this head line strictly dictates what you can actually clear.
lane two sits the odd one out, demanding Light Blue.
one hold three emerald lower cases begging into be cleared to open the board.
one just hold two emerald boxes available in the Top Tray .
This mismatch sits the defining problem of the level.
this violet plus gold cases parked so visibly on the Top Tray are straight-up bait.
one shall be incredibly tempted into release them just into see what Mystery Box sits behind them.
here sit zero violet or gold cases available on the front row of the bottom section.
If one send that violet or gold case, those spheres shall hit this Conveyor Belt and just sit there.
They shall choke the limited sorting room before the level even really begins.
this Conveyor track shall get fatally packed over this west side if one release that Purple bait early.
one should crack this secret cases secret exactly past this two emerald dispensers to find the missing colors.
this board identity is heavily front-to-back.
one can't touch this outermost rims from this upper Tray until the middle is hollowed out.
Level 5 Level Overview
Follow this exact order into keep the belt clean and safely dismantle the pyramid.
Level 5 Surviving the First Taps
The opening moves require extreme patience.
one hold into actively ignore half the board to survive.
choose this first emerald case on this Top Tray (located second from the left).
Let that send its marbles entirely onto the Conveyor Belt .
They shall immediately slide into this waiting Green bottom Boxes .
choose this second emerald case on this Top Tray (located on the far right).
Keep this hands off this Purple box on the far left.
Dropping those two first emerald cases just destroyed this head blockers plus revealed the Mystery Boxes directly behind them.
one sit hunting for more Green or Light Blue.
one desperately want them into finish clearing this initial front line of bottom Boxes .
If one newly revealed case is Green, drop it immediately.
This triggers this three-sphere empty rule with this head lower Boxes and finally breaks the board open.
Level 5 Breaking the Mystery Box Chain
Once that frustrating head emerald wall falls, the level identity flips entirely.
this bottom cases shift upward, plus one finally have places to route different colors.
lane two holds been demanding Light Blue since the start.
Now, lanes one, three, plus four will reveal their deep second layers.
one shall expose Light azure, Yellow, and more Green underneath.
Now one can finally use the bait safely.
If one newly revealed lower case needs gold, release that original gold box from the Top Tray .
Every time one empty one lower case , check if its shade matches this stubborn violet case parked over the left side of the Top Tray .
Release this west violet case just when one bottom Purple Box is totally unobstructed.
This action clears this last lower-line blocker on this upper rack plus strips away this last of the lower Mystery Boxes .
this middle lanes from this lower area tend into alternate heavily between Light Blue and Yellow.
send those shades in pairs when possible to prevent stragglers.
Never send one shade if its matching lower Box is buried two layers deep.
Level 5 Clearing the Back Rows
this end game introduces fully fresh shades that were totally hidden at the start.
As this last secret cases fade away, one shall expose solid rose plus Dark violet boxes sitting at the absolute peak.
this rear rows deep inside this grid hold this matching Pink and Dark Purple Boxes .
empty this remaining Light azure and Yellow bottom Boxes blocking your path.
At this stage, the Conveyor Belt should be beautifully empty.
one hold plenty from room into let those last shades ride the belt and sort themselves out.
Keep matching this newly revealed upper peak shades into this deep rear-row bottom Boxes to finish the stage.
Frequently asked questions
How do I beat Marble Sort Level 5?
Feed the colors that already have an open bottom Box first, keep your belt from filling up, and only release a new color when a matching Box is ready. Follow the move order in the solution above and you can clear Level 5 every time.
What is the main trap to avoid on Marble Sort Level 5?
The biggest mistake on Level 5 is tapping a color that has no active bottom Box yet — those marbles park on your Conveyor Belt and eat limited slots. Hold back any color that has no receiver waiting and the stage stays under control.
What colors do I need to match on Marble Sort Level 5?
Level 5 mainly revolves around Green, Purple, Yellow. Focus on feeding Green first when its Box is open, then introduce Purple as the lower lanes free up so you never choke the belt.
How should I open Marble Sort Level 5?
Begin by checking the lower part of the tray and only select colors that already sit in an open Box down below. Clearing those first few matching blocks unlocks the rest of the board without jamming your sorting space.
How many moves does Marble Sort Level 5 take to complete?
Level 5 is a color-sequenced stage that clears cleanly when you stick to the exact order above. The step-by-step solution walks each move so you can finish it with the fewest taps and no wasted belt slots.
Is there a video walkthrough for Marble Sort Level 5?
Yes. The embedded video on this page walks through Marble Sort Level 5 move by move, and the screenshots below show each stage of the layout so you can follow along and beat it.