
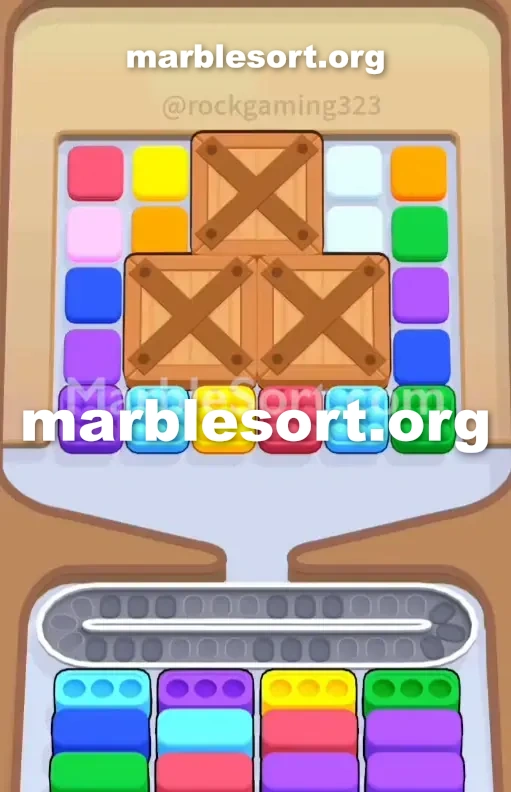
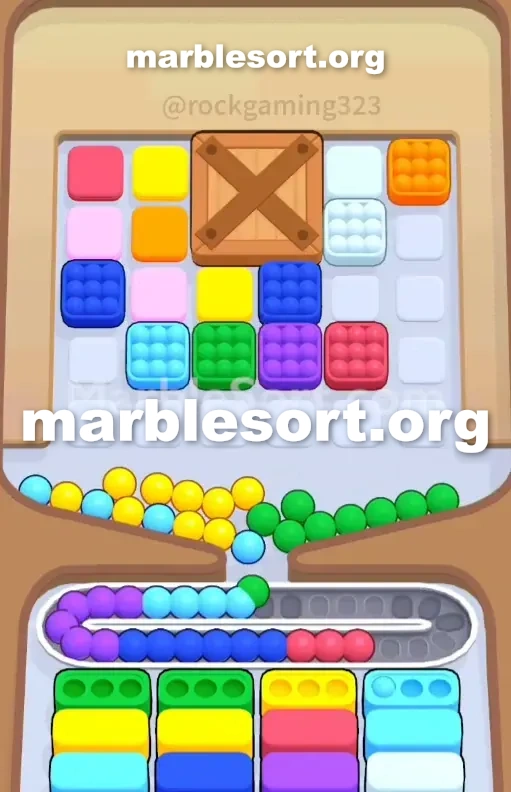
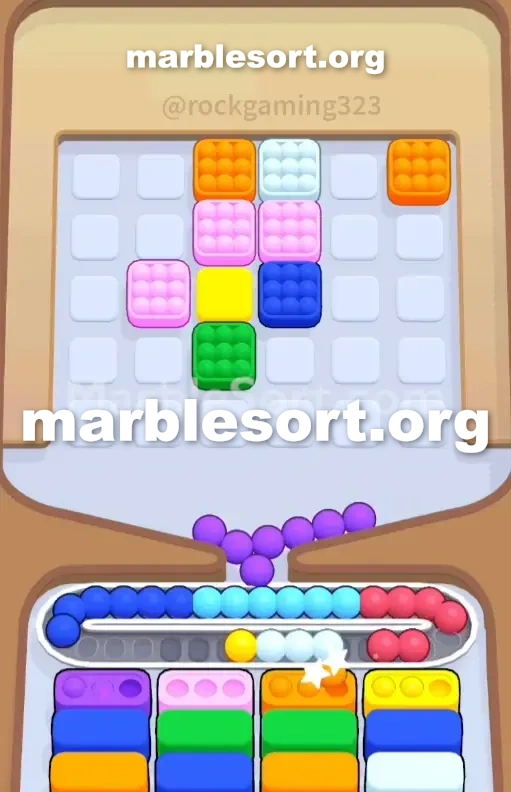
关卡截图


逐步解法
- 1) Ignore the upper half of the board and only feed the front boxes: tap the bottom-left Purple below the crates and the lowest Purple on the outer left column to finish the mid-left Purple receiver.
- 2) Tap the Yellow marble in the bottom row under the crates and drop it into the mid-right Yellow Box.
- 3) Take the Green ball at the bottom row's far right together with the lowest Green on the outer right column and drop both into the far-right Green receiver.
- 4) Draw both Light Blue balls out of the bottom row and put them in the lonely far-left Light Blue receiver.
- 5) Once that first wave drops away, the second row lights up demanding Dark Blue, Light Blue, Red, and Purple, and clearing those blocks removes the wooden crates to expose a dense Orange, White, Light Pink, Pink, and Yellow block.
- 6) Do not tap those fresh center colors yet — drop the Red you left behind into the mid-right Red Box, then pull the Dark Blues from the middle of both outer columns into the far-left Dark Blue Box.
- 7) Clear the leftover Purple and Light Blue from the outer edges, then when the third row asks for Green, Red, and more Purple, pull those only from the exposed center mass and the remaining outer stragglers.
- 8) For the final row that wants Orange, White, and Light Pink, dump the top-right Oranges and top-left Pinks onto the belt and flush the big White and Light Pink center cluster so it sorts straight down.
Level 122 Wooden Crate Center Trap
one just loaded into this level and immediately saw the problem.
Three huge wooden crates sit sitting dead center in the Top Tray .
just this extreme outermost lanes plus the very bottom horizontal row are playable.
this dominant shades one hold into deal using first are Purple, Light Blue, Yellow, and Green.
those exact shades match this active top row of the bottom Boxes .
this board throws easy access into crimson plus Dark Blue marbles right in your face.
If one tap them, you clog the Conveyor Belt .
one can't bring from this upper outermost columns until the bottom rows clear out.
Let's break down exactly how into dismantle this board without jamming your belt.
Level 122 Crate Blockade Pattern
Look closely at how this exact board is mapped out.
this middle sits one blind zone covered via three big wooden crates, leaving just one thin perimeter of marbles available to tap.
The outer left column is entirely exposed.
From upper into lower, that holds rose, Light Pink, Dark Blue, and two Purples.
From upper into lower, that holds amber, Green, Purple, Dark Blue, and Green.
Below this giant crates, one hold one single horizontal lower row of marbles waiting to be dropped.
Reading from west into east, this line gives one violet, Light azure, Yellow, Red, Light Blue, and Green.
this ready upper line requires Light azure over this far west, violet on this center-west, gold on this center-right, and Green on the far right.
Notice this crimson sphere parked perfectly accessible on the bottom row of the Top Tray ?
Notice this Dark azure spheres parked halfway onto the left and right outer columns?
this second line from lower cases hides Dark azure, Light Blue, Red, and Purple.
If one send crimson or Dark azure down into this Conveyor track right now, they have nowhere to go.
They shall just sit here, eating onto valuable room as one desperately try into clear the top row of Boxes .
this bottom Boxes strictly control the order of play.
one hold into route this exact shades needed with this upper line, which means stripping this lower line from this upper rack plus carefully pulling from this bottom of the outer columns.
this east side from this Conveyor track gets incredibly packed first if one accidentally release that easy amber marble from the top right.
one should empty this front line of bottom Boxes to survive.
Once this inner crates vanish, one huge group from secret shades shall flood the board, completely changing your priority.
Level 122 Level Overview
Follow this release order into keep the belt clean and bust the center open.
Level 122 Opening Moves
one hold into act as this top half of the board does not exist.
this just goal east now sits feeding this Light azure, Purple, Yellow, and Green bottom Boxes .
choose this lower-left Purple marble sitting below the crates.
that drops right into the waiting Purple Box .
choose this lowest violet sphere over this outermost west lane to finish clearing that mid-left Box .
choose this gold sphere parked in the bottom row under the crates.
Send that straight into the mid-right Yellow Box .
take this emerald sphere over this far east from this lower line, plus this lowest emerald marble on the outer right column.
route them into the far-right Green Box .
bring this two Light azure spheres from the bottom row under the crates.
They belong on the far-left Light Blue Box .
that rests on this middle of the bottom row looking lonely.
via following this strict order, one clear the front line of bottom Boxes .
this moment they send away, the second row activates.
This is your first major progression trigger.
Level 122 Surviving the Midgame Shift
Clearing that first wave changes everything.
this second line from lower cases sits now ready, asking with Dark Blue, Light Blue, Red, and Purple.
More importantly, breaking this surrounding spheres removes this massive wooden crates from the Top Tray .
that uncovers one dense piece from amber, White, Light Pink, Pink, and Yellow marbles.
Do not immediately choose these newly revealed center colors.
send that crimson sphere one deliberately left behind in the opening phase.
that now holds one home in the mid-right Red Box .
bring this Dark azure spheres from this middle from the outer left and outer right columns.
Send them into the far-left Dark Blue Box .
empty this remaining violet plus Light azure spheres from this outermost rims into finish off this second wave of Boxes .
this Conveyor track pressure gets extremely high right here.
since this middle just opened, that sits highly tempting into start tapping this bright Pink and Orange blocks.
If one flood this track using ivory plus amber spheres now, one shall hit one blind wall since those cases sit stuck deep in the third and fourth rows.
Level 122 Final Cleanup
this board sits fully available, plus this third line of bottom Boxes is pulling up.
the ready cases shall now demand Green, Red, and more Purple.
bring those strictly from this newly exposed middle mass and the remaining outer column stragglers.
Once this third line clears, this final row of bottom Boxes appears.
This sits where one finally need Orange, White, and Light Pink.
Dump this remaining upper-east amber spheres plus top-left Pink marbles onto the belt.
Flush this giant middle cluster of White and Light Pink marbles.
since one saved them with last, they shall right sort into their waiting cases without touching this edges of the Conveyor Belt .
Keep crimson plus Dark azure off this track on this first minute, plus you will easily crush this level.
常见问题
What is the main trap to avoid in Level 122?
The biggest mistake is tapping colors that have no active bottom Box yet. They park on your Conveyor Belt and burn limited slots, so clear the shades that actually have receivers first.
How should I open Level 122?
Ignore the upper layers and aim at the bottom row of the Top Tray. Feed the colors that already have open boxes, then work upward once the lower lanes shift.
When does the midgame color change happen in Level 122?
After the opening boxes fall, the lower columns swap what they demand. Watch for the new shades and only pull blocks that match a box sitting at the front of a lower lane.
Any tip for finishing Level 122 clean?
Keep at least a few empty belt slots before poking mystery or hidden boxes. Feed a revealed color the moment it matches an active box, and fall back to visible marbles when the belt gets tight.