





Marble Sort Crates Guide: How the Three-Hit Wooden Block Breaks
Here is a number that surprises most players: across our full index of all 805 Marble Sort level solutions, the word “crate” is attached to 73 levels — but zero of them are in the first 100. The crate is not a beginner obstacle. It quietly arrives at Level 121 and then refuses to leave, which is exactly why so many players hit a wall the first time a wooden box parks itself over their best colors.
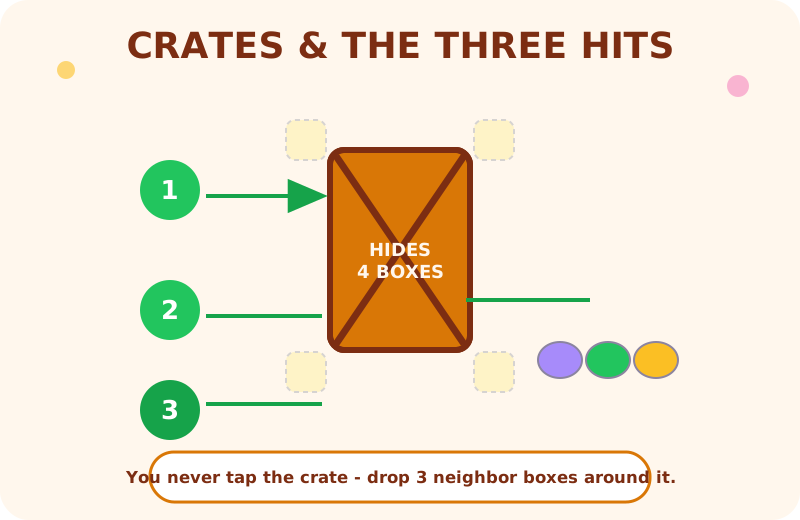
A crate is not a marble box. It is a wooden blocker that seals four other boxes underneath it, hiding their colors and cutting off the path to them. You cannot tap a crate directly. You break it by feeding the board around it, and the third neighbor drop is what finally splits the slats open. Get that timing wrong and the crate stops being an obstacle and starts being a trap that floods your conveyor.
This guide explains the three-hit rule, what crates actually hide, the belt-overflow trap, and the one timing habit that turns a crate from a liability into free board space.
What a Crate Actually Is
A crate is a wooden blocker sitting in the upper board that covers four marble boxes at once. While it is intact, you cannot see the colors underneath it and you cannot route to them. It is information denial and access denial in one object, which is why a single crate can freeze an otherwise open level.
Think of it as a wall, not a box. You never tap the crate itself. The game tracks how many neighbor boxes around it you have dropped, and the third one is what makes it split. That distinction — you are paying three of your own drops to open somebody else’s stash — is the whole reason crates are a resource decision, not a reflex.
The Three-Hit Rule
The rule is mechanical and fixed: drop three neighbor boxes touching the crate and the third drop cracks it open. Those neighbors can come from the Top 2, Bottom 2, Left 2, or Right 2 positions around the crate, so you usually have several candidate lines to work from.
Three things make this deceptively costly:
- Each of the three drops is a normal commit to your conveyor. You are spending belt space and turns to buy access, not to make progress on your own colors.
- The marbles you drop during those three hits still have to land somewhere. If you feed a neighbor box whose color has no matching bottom slot, you have paid to clog your own belt.
- The reward is unknown until it opens. A crate can hold exactly the color you needed — or four boxes of junk and another hidden box.
So the three-hit rule is really a budgeting rule: you are buying information and access with three of your scarcest moves.
What Crates Hide
When the third hit lands, the crate releases roughly four boxes that were sealed underneath. In our level index those revealed boxes show up as normal boxes, hidden (question-mark) boxes, colors you already want, colors you explicitly do not want, or mixed sets. On a level like Level 200 the board is ringed by crates, and cracking the corner ones is what flips a stalled board into a solvable one — but only because the player had already cleared the safe center first.
This is the key mental model: a crate is a bet. Sometimes the pot is gold, sometimes it is another locked problem. A hidden box behind a crate is a problem-within-a-problem, and it links straight to the mystery box guide, because you will spend the same discipline there — wait for the reveal, then act.
The Belt-Overflow Trap
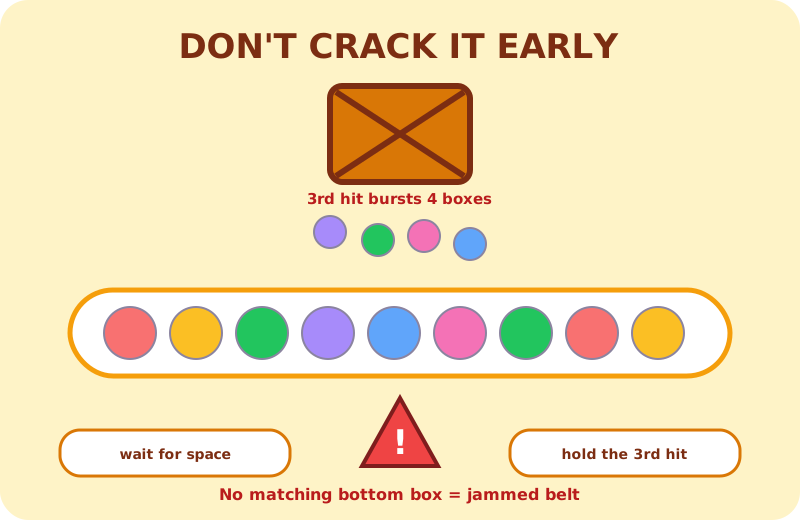
Here is the failure that ends most crate runs. Your conveyor has a limited number of slots — treat it as the real enemy, as covered in the conveyor space management guide. Now suppose you crack a crate while the belt is half-full of marbles that have no matching bottom box yet. The crate dumps four new boxes and a burst of colors onto the belt. Several of those colors have nowhere to go. The belt jams, the belt fills, and the level fails.
The trap is that breaking a crate feels like progress. It looks like you are removing an obstacle. You are not — you are converting one hidden, contained problem into four visible, urgent problems, all at once, onto a belt that may not have room for them.
The Timing Rule That Fixes It
The fix is one habit: hold the third hit until the belt has space, and land it on top of a bottom box that is nearly finished.
Concretely:
- When a crate is two hits away, stop and scan. Is a matching bottom box close to clearing? Is the belt roomy enough to absorb four new boxes?
- If yes to both, spend the third hit. The crate bursts at the exact moment a bottom box empties, so the belt gets breathing room just as the new boxes arrive.
- If no, do not tap the crate. Keep clearing the safe, already-visible colors until a demand opens that the crate can feed.
Only open a crate when the move also feeds a bottom slot you already have. Crates punish blind taps. This single rule removes most crate losses, because it converts the crate from a coin-flip into a planned exchange: three of your drops for four boxes that you already had somewhere to send.
What the Data Says About Crates
Because this site tracks the whole puzzle set, we can be precise about where crates bite. Counting keyword mentions across all 805 of our level solution entries:
- Crates appear in 73 levels in total.
- 0 of the first 100 levels contain a crate — the mechanic is fully absent from early game.
- The debut is Level 121, and the heaviest band is 101–200, where 16 levels use crates.
- After 600 it thins out to roughly 7 per band, so crates are a mid-game pressure, not a late-game one.
The takeaway from our own data: if you are still in the first 100 levels, the crate habits above cost you nothing to build now and save you a wall around Level 121. Treat 101–200 as the crate season.
The Three-Hit Checklist
Before you tap anything near a wooden box, run this list:
- Can I name which bottom boxes the crate’s colors will feed?
- Is the belt roomy enough for four new boxes?
- Is a matching bottom box close enough to clear on the same move?
- Am I spending the third hit to open the crate as that box empties — not before?
If any answer is “no”, the crate waits. If all are “yes”, break it.
Frequently Asked Questions
How do you break a crate in Marble Sort?
You do not tap the crate. Drop three boxes in the neighbor positions around it (Top 2, Bottom 2, Left 2, or Right 2). The third neighbor drop cracks the crate open.
What does a crate hide?
Roughly four boxes that were sealed underneath: normal boxes, hidden boxes, useful colors, junk colors, or mixed sets. You only learn which after it opens, so treat opening a crate as a bet.
When should I open a crate?
Only when your conveyor has room to absorb four new boxes and at least one matching bottom box is close to clearing. Land the third hit so the crate bursts as that bottom box empties.
Why did opening a crate make me lose?
Opening a crate early converts one contained problem into four urgent ones on a crowded belt. If the revealed colors have no matching bottom slot, the belt jams and fills. Hold the third hit until the belt has space.
Are crates common in early levels?
No. Across our 805-level index, none of the first 100 levels use crates. They debut at Level 121 and are heaviest in the 101–200 range.
Should I use a booster on crates?
Crates are not a direct booster target, but keep the cannon or shuffle ready for the moment a crate bursts into a layout whose colors you cannot currently collect. See the boosters guide for when each one actually pays off.
Where to Go Next
If the crate taught you one habit, it is that space beats speed — which is the whole lesson of the conveyor space management guide. Pair this page with the golden rules cheat sheet for the reusable core loop, and drill the crate-heavy stretch on the Level 121 solution. To practice the whole obstacle set in order, start from the beginner guide and grab the game from the download page.