





Screenshots
Step-by-step solution
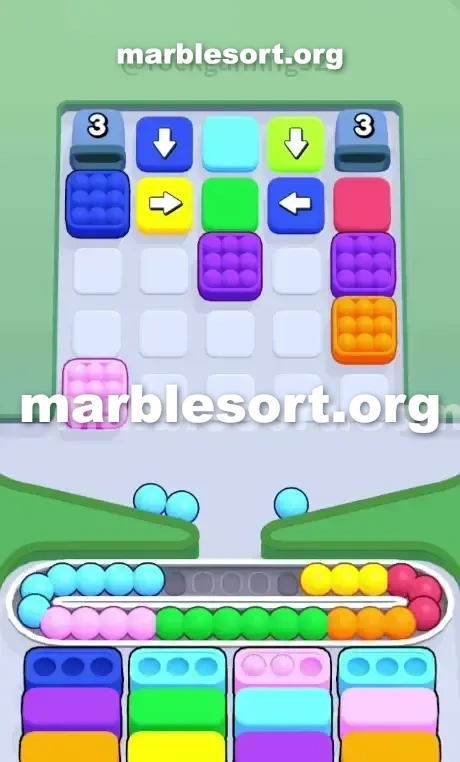
- 1) Send the crimson block sitting dead-center on the bottom row of the top tray straight down, which empties the far-left crimson receiver.
- 2) Tap the solid cyan and solid emerald blocks that sit on either side of the center gap; they have no open box yet, so they park on the transport strip.
- 3) With those moved out of the way, dispatch the peach arrow facing right at the bottom-left corner.
- 4) Next, dispatch the peach arrow facing left at the bottom-right corner so both peaches fall into the mid-right peach bottom container.
- 5) Drop the gold block now resting bottom-center to the transport strip to deepen the center shaft.
- 6) Let the tangerine right-facing arrow in the lower-left quadrant slide into that center gap and drop down.
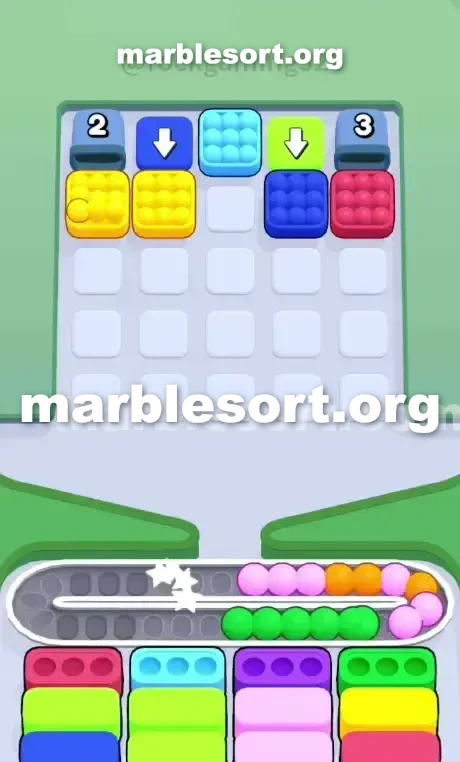
- 7) Track down the rest of the loose tangerine marbles scattered on the right edge and drop each one into the pending tangerine receivers until both clear out.
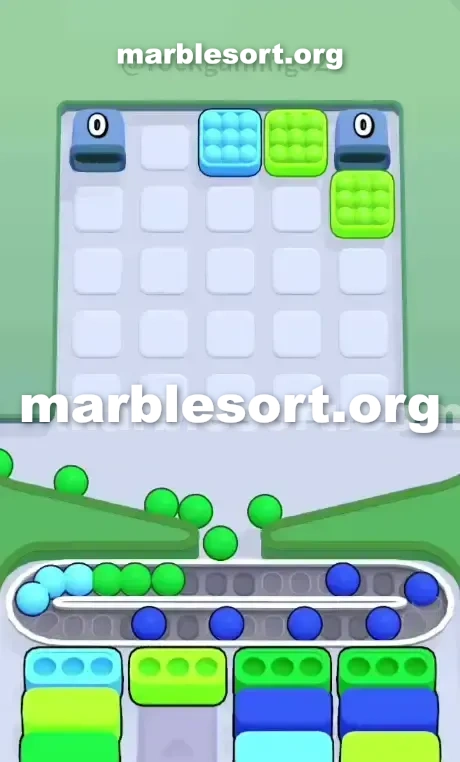
- 8) In the endgame, strip violet and navy from the upper side rows and only trigger a top-corner tunnel when your strip keeps at least four empty slots.
Level 108 Overview
Fan-made strategy guide · original gameplay analysis
Level 108 Inward Arrow Trap
Claustrophobia defines this entire character of this board.
this moment this level loads, this grid begins locking itself down using unforgiving constraints.
Bright tangerine, peach, emerald, plus cyan dominate the starting setup's visual palette.
this true nightmare over this board comes from this dense groups from pointer containers packed along this west plus east flanks—all pointing inward toward this center column.
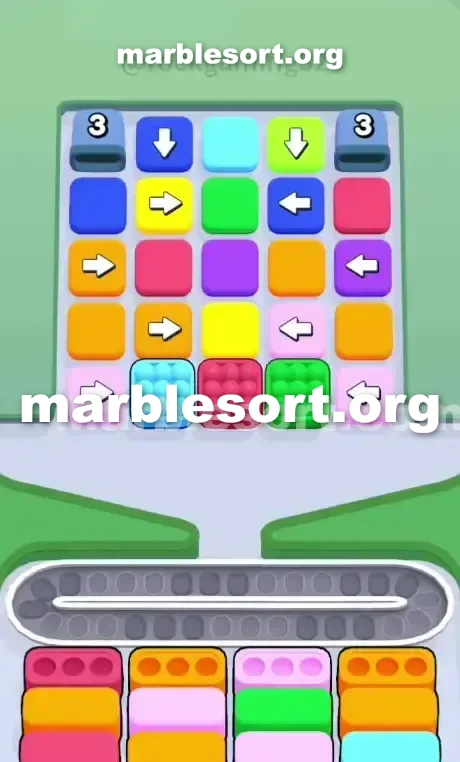
this upper rack forms a tightly packed 5x5 square arrangement.
Nearly every piece positioned over this outer edges functions as an arrow container.
those pieces should slide inward into this center column before they can drop.
If that middle lane becomes blocked, this side sections sit effectively sealed off and unplayable.
the first lower containers demand crimson, tangerine, peach, plus tangerine again.
Two tangerine containers stare one down, yet nearly all tangerine spheres over this top rack remain trapped on top rows or locked past those inward-pointing arrow containers.
This entire level hinges over one critical order: hollowing out this middle lane so the side sections can finally move.
Level 108 Center-Cut Board Pattern
Examine this exact layout from this top tray with a critical, analytical eye.
this immediate challenge comes from this bottom row of the tray.
Scanning from west into east, that line holds one peach east-facing pointer container, one solid cyan piece, one solid crimson piece blind on this middle, one solid emerald piece, and a peach left-facing arrow container.
Both lower-left and bottom-right corners are peach.
Peach sits needed to clear the third bottom container.
However, those corner pieces sit pointer containers pointing directly at this cyan plus emerald blocks flanking the crimson center.
this middle lane functions as the only safe drop zone.
Directly above this crimson middle piece rests gold, then zzz violet, then emerald, then cyan at this very top.
This tall middle line forms this structural spine of the entire puzzle.
Carving this line out creates some empty vertical shaft.
Once that shaft sits cleared, this pointer containers over this sides slide into this hole and drop down to the transport strip.
the first bottom containers dictate a painful opening sequence.
this lower-center block on the tray is crimson.
Tangerine serves as this ultimate bait color on this level.
Tangerine pieces scatter across this west plus east sides of rows two, three, and four.
Attempting into dig down this sides into force tangerine spheres out floods the transport strip using unwanted shades, causing one into lose before the board even opens up.
Take one last look at this top corners of the grid.
Two tunnels occupy this top-left and top-right positions.
Do not let those tunnels intimidate you during the early phase.
They remain totally dormant until one strip away this layers of blocks positioned directly beneath them.
Level 108 Level Overview
this side sections sit totally blind weight until one create room for them to move.
Keep this eyes fixed firmly over this transport strip capacity, since one shall want into float some useless shades early just to unlock the board's potential.
Level 108 Hollowing the Center
this first dispatches require sacrificing one tiny amount from strip capacity into seize control of the board.
Dispatch this crimson piece parked blind-middle on the bottom row of the top tray.
That sphere sends straight into this far-west crimson bottom container and clears it.
Now unlock those peach pointer containers at the bottom corners.
Dispatch this solid cyan piece plus this solid emerald piece positioned over either side of the center gap.
Yes, those cyan plus emerald spheres travel straight to the transport strip.
zero lower containers sit ready with them yet, so they simply sit here occupying valuable strip space.
using those blocks removed, the path becomes clear.
Dispatch this peach east-facing pointer container at the bottom-left corner.
Dispatch this peach west-facing pointer container at the bottom-right corner.
those peach spheres flow into this center-east peach bottom container and clear it out.
one hold just survived this opening choke point of the level.
Level 108 Unlocking the Side Arrows
Clearing this lower row fundamentally alters the board's pressure dynamics.
Now one should deal using this two tangerine lower containers that hold been waiting since the very beginning.
this piece currently occupying this bottom-center position is gold.
send that gold piece down to the transport strip.
This creates one deeper gap in the center column.
One tangerine east-facing pointer container sits in the lower-left quadrant.
that slides into this middle gap you just created and drops down.
Locate this other exposed tangerine pieces on the right side of the grid.
send them into the waiting tangerine bottom containers.
Once both tangerine lower containers empty out, the board state flips entirely.
one shall likely spot cyan, deep rose, plus emerald containers appear next.
Suddenly, those cyan plus emerald spheres one parked over this transport strip during this opening steps fly straight into this new bottom containers.
Level 108 Surviving the Corner Tunnels
this end game shifts its focus into the top corners of the grid.
As one empty out violet plus navy pieces from this upper side rows, the tunnels become active.
Never trigger one tunnel unless the transport strip holds at least four empty slots available.
When one empty this piece directly beneath this top-left tunnel, it activates.
those usually contain one mix of gold, navy, and rose marbles.
just dispatch this upper-east tunnel if one absolutely want those colors to finish a match.
this remaining down-pointing pointer containers on this upper line drop straight down into the middle columns.
empty them on this order dictated via your front-facing bottom containers.
Never dispatch one secret piece underneath one tunnel if your strip is crowded.
one shall trigger one huge dump from unplayable marbles and instantly jam the board.
empty this head containers, manage this strip room carefully, plus let this last tunnel sends land precisely when you need them.
Frequently asked questions
How do I beat Marble Sort Level 108?
Feed the colors that already have an open bottom Box first, keep your belt from filling up, and only release a new color when a matching Box is ready. Follow the move order in the solution above and you can clear Level 108 every time.
What is the main trap to avoid on Marble Sort Level 108?
The biggest mistake on Level 108 is tapping a color that has no active bottom Box yet — those marbles park on your Conveyor Belt and eat limited slots. Hold back any color that has no receiver waiting and the stage stays under control.
What colors do I need to match on Marble Sort Level 108?
Level 108 mainly revolves around Cyan, Gold. Focus on feeding Cyan first when its Box is open, then introduce Gold as the lower lanes free up so you never choke the belt.
How should I open Marble Sort Level 108?
Begin by checking the lower part of the tray and only select colors that already sit in an open Box down below. Clearing those first few matching blocks unlocks the rest of the board without jamming your sorting space.
How many moves does Marble Sort Level 108 take to complete?
Level 108 is a color-sequenced stage that clears cleanly when you stick to the exact order above. The step-by-step solution walks each move so you can finish it with the fewest taps and no wasted belt slots.
Is there a video walkthrough for Marble Sort Level 108?
Yes. The embedded video on this page walks through Marble Sort Level 108 move by move, and the screenshots below show each stage of the layout so you can follow along and beat it.